Community Video for Nutrition Guide

Component 2: Production

MIYCN Elements: Identify Content | Package of Practices | Storyboard Development | Identifying Actors | Pretesting | Technical Review

The SPRING/DG collaborative approach represents a unique combination of technology and social and behavior change communication in support of improved nutrition. The main components are videos featuring local community members, each video demonstrating a particular high-impact nutrition practice and its benefits. Production and screening of the videos ignites a chain reaction through the community, sparking the adoption and promotion of improved practices and making this knowledge actionable. The key to success is producing relevant, good-quality videos that generate and maintain community interest. This section describes procedures for producing these videos and applying quality standards and feedback mechanisms to both identify content and enhance its quality.
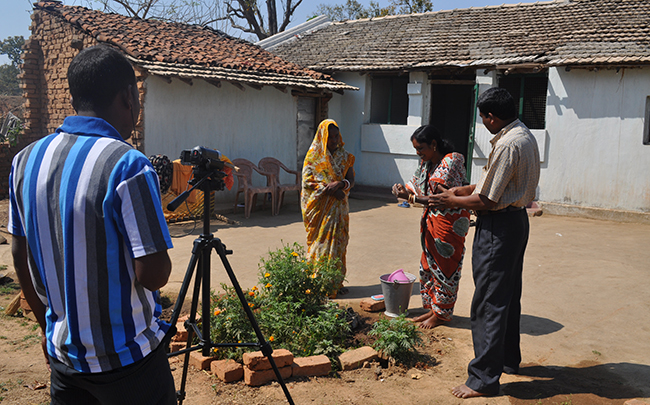
Photo of a man filming three people outside with a video camera on a tripod

Figure 2 below details the steps in the production process with bolded emphasis on the elements specific to the MIYCN approach detailed in this guide. The other steps are only briefly summarized below and are further detailed explained in the DG SOP.

Figure 2: Production

Click on the "Read section ..." buttons below and the corresponding steps in the process will appear.

Content Development
 
  1. Use formative research and consult with the community to inform topic selection.
  2. Document and analyze community interest in new topics from feedback on previous disseminations.
  3. Identify adoption points and create a package of practices for each behavior to track adoptions and promotions.
Video Production
 
  1. Develop a storyboard for each topic
  2. Identify early adopters as actors in the community to feature in each video
  3. Shoot the video following the storyboard
  4. Edit video clips and add breaks with text annotations
Quality Assurance
 
  1. Pretest the video with an audience to ensure comprehension
  2. Ensure technical review for accuracy of content and audio/video quality
  3. Add subtitles to the video for global review / dissemination

2.1 Content Development

Each video should focus on a specific behavior that it aims to influence the target audience. Key findings of the formative research should have yielded a list of relevant, locally feasible behaviors that the project can address. Because MIYCN behaviors are rooted in cultural norms, the formative research is important in that it serves to gather the community’s voice to understand how to prioritize and negotiate the behaviors that are globally recommended. New behaviors to be implemented should not be highly complex but instead should be small and doable, actions that will have a nutritional impact and that are easily negotiable given the project community’s economic, gender, social, and other constraints. It is important to recognize where specific commodities or other resources (e.g., iron–folic acid tablets) or specific services will be key to translating information into new behaviors.

Based on their strong linkages with the community, local partners often have a good understanding of the project context and can help contribute or refine topics identified for video production. Additionally, as audience members ask questions and request specific information, the disseminations themselves should prove a source of topics for future videos. The production team and subject matter specialists should regularly review feedback from disseminations, discuss suggested topics, and review them with technical advisors or a technical advisory committee.

Project Experience: Video Topics

By pretesting, you may find that video content is best understood when it focuses on demonstrations of simple, feasible actions. Thus, more complex content should be broken up into microbehaviors that are featured in more than one video in a series. For example, in the India project, the topic of exclusive breastfeeding for six months was broken up into two videos. The first focused on early initiation of breastfeeding and exclusive breastfeeding, while the second looked at how to manage breastfeeding while working. Many discussions were conducted with technical and local teams about whether to introduce the concept of expressing breastmilk. In the end, it was agreed that it would be addressed as an option for working mothers but not fully explained, as including a more detailed explanation would require covering too many concepts in one video. A third video in the series could have been specifically designed to fully address the topic of expressing breastmilk.

Formulating a Package of Practices

What is a Package of Practices (POP)?

Adapted from agriculture parlance, “POP” refers to the steps for growing different crops in a scientific manner to obtain the optimal yield. It broadly covers the steps between seed selection and harvesting. In other subject areas, such as health and nutrition, POPs refer to the details of a particular practice, such as the key messages or what the practice entails.

A critical next step in the production phase is to develop a package of practices (POP) for the priority video content, highlighting the behaviors and key messages (also known as “non-negotiable adoption points”) as well as the questions that local teams will use to subsequently verify behavior adoptions and promotions. To ensure that the videos are technically sound, design a POP either jointly with global technical partners or with local partners, if they have the requisite nutrition expertise. Documenting established practices within the community through formative research is an important step in developing POPs and storyboards to refine key messages and ensure that the videos respond appropriately to cultural norms, existing myths, and/or barriers and facilitators to a given behavior and current practices.

Each POP should contain details such as:

  • Video type (e.g., success story or demonstration).
  • Overview of the video theme and content.
  • Key messages and non-negotiable critical points to be featured in the video as text and voiceover annotations featured on the screen during deliberate pauses in the video. These key messages and critical points are also used to assess knowledge retention as part of the adoption verification process, when direct observation is not possible.
  • Other key messages that are important to remember and to include in the video but that are not critical to adoption verification.
  • Details of annotations, adoption/promotion verification knowledge points and facilitating questions to be asked by local teams to verify adoptions. These details are directly pulled from the POPs for the development of adoption verification job aids.

Project Experience: Defining Adoptions for Nutrition

It was not feasible or possible to directly observe whether the target audience adopted many of the MIYCN behaviors that the project promoted. Nor was it possible to verify all occurrences of behaviors that are practiced multiple times daily. As proxies for directly observing adoption, local teams used self-reported behavior adoptions and knowledge recall of the non-negotiable points from the videos. Whenever possible, however—such as for handwashing—the teams directly observed the practice and physical presence of necessary enabling technologies (such as tippy taps) to track adoptions.

The creation of the POP is an important initial step that informs storyboarding of the videos. Share the POP with the local partner organization and video production team for their review. With the finalized POP and story line ideas for each topic, the video production team can begin storyboarding, as detailed in the next section. For a sample POP from the nutrition community-video project, see Appendix 5.

Tools
Appendix 5: Package of Practices Samples
Appendix 6: Adoption Verification Job Aid Sample

The next step is to develop the adoption verification job aid (Appendix 6) which reiterates key practices outlined in the POP and included in the videos, and assists mediators in identifying whether practices are being executed correctly. The job aid should include the same information and should be created at the same time as the POP so that the POP, video content, and adoption verification job aid are all coordinated. During disseminations, mediators can use the job aids and the POP to reference points critical to each recommended practice.

Read the next section

2.2 Video Production

Storyboarding

Storyboards help the video production team authentically capture a lead actor’s free-flowing conversation while ensuring accuracy and completeness of the technical MIYCN information being conveyed. Storyboards also help you organize and sequence a story or process into a clear and understandable narrative. These storyboards are different than an audiovisual script, which is an extremely detailed, line-by-line description of a movie, including dialogues. Storyboards used for these community videos may even be different and less exhaustive than conventional storyboards. They provide the overall gist of each shot, including technical details such as scene selection and location, and serve as a general guide for the video production team and actors. The absence of storyboards may results in confusion or inaccuracies, lead to challenges in maintaining the quality and accuracy of the final product, and make the entire process unnecessarily time-consuming. In short, good storyboarding saves time and reduces the gap in understanding between the technical and production teams.

Tools
Appendix 7: Video Production Planning Sheet and Storyboard Template
Appendix 8: Sample Review and Approval Process with Technical Partners

Creating a Storyboard

Begin the process of storyboarding with a brainstorming exercise among the technical partner/advisor and the local partner team, including the video production team. Using the POP as a starting point, aim to visualize a possible story line and begin identifying early adopters from within the local community to star in the video. A sample storyboard can be found in Appendix 7.

After the brainstorming session, convert the brainstormed story line into a storyboard with a logical sequence. Identify who will star in the video, where the shoot will take place, how the video will be shot, and the non-negotiable adoption points. Your storyboard should include an opening, a climax, and a resolution. The storyboard should provide a pictorial representation of each shot; indicate materials required for shooting; and specify a logical sequence of shots with the shot type, duration, and desired audio track for each shot.

Storyboard formats may vary but are generally divided into two segments:

Production Planning Sheet

  • Author: Name of the storyboard writer
  • Topic Name: Title of the story (reflecting the content)
  • Topic Type: Categorize as demonstration, success stories, discussions, or interviews on such topics as social mobilization, agricultural practices, animal husbandry, health, nutrition, or institutional building
  • Village, Block, and District: Where shooting is taking place
  • Language: Local dialect used in the video
  • Camera Person, Facilitator, and Editor: Names of production team members
  • Actors: Names of actors in the video
  • Non-negotiable Adoption Points: A list of points from POP that must be covered
  • Shooting Preparation: Materials, site selection, prepared foods, etc.
  • Approvals: Name of technical reviewer and any feedback from approval

Storyboard Panels

Storyboard panels represent the story pictorially. These panels cover the story’s primary components in sequence, with each panel equivalent to one shot or scene. The panels make it possible to visualize the scene, including its shot type and duration. Alongside each panel is a narrative of the scene, detailing the scene as it is visualized in the panel. Storyboarding does not require artistic skills; each panel can be simply a rough sketch or even stick figures.

After the storyboard is developed, have it approved by the technical partner (assuming the partner was not directly involved in creating it), following a process previously agreed upon for review and approval by the partner consortium. Appendix 8 describes a particularly extensive review process by a global technical partner, in the absence of a local technical nutrition partner. The proof of concept project entailed heavier technical support in the beginning of video production and as more videos were made and teams became more comfortable with the technical content, they had greater autonomy and the technical partner exercised less oversight. Technical oversight and review by a local nutrition partner should be the preferable method to ensure local ownership, sustainability, and faster turnaround time for reviews.

Recruiting Community Stars

Whenever possible, to ensure authenticity and highlight the feasibility of demonstrated promoted practices, select early adopters who are already practicing the recommended behavior in the community as stars for the videos. When producing videos on nutrition behaviors and concepts that may be completely new to communities, take care to choose an early adopter to try the practice who can become a trusted source of information about the practice and will be able to deliver messages correctly and in a way that allows the community to connect with the actor. Featuring individuals who are themselves new to a practice can motivate viewers who may have doubts about the feasibility of adopting the practice. Community members are typically eager and excited to be featured in a video and often gain social status as a result of their participation. Starring in the video will also affect their own adoption of the practice—they will come to be seen as a role model for that practice in their community. Given production teams’ familiarity with the community, give them the responsibility for recruiting video stars. During formative research, take care to identify early adopters to recruit for videos.

After production teams have created a short list of potential stars, have them visit each candidate to inquire about and observe the specific practice; they should recruit the most appropriate and interested community members, families, or influencing individuals as stars. Those selected should be currently practicing the recommended behavior or eager to try it; should be conversant about the topic of the video and the specific behavior; and should be confident in his or her ability to act in the video.

Tools
Appendix 9: Consent Form for Video Stars Template

The video production team must be clear about the expectations for the video shoot, the amount of time required, and the exposure that the stars will have. The team should then work with the star or stars to schedule the most appropriate and convenient time to shoot the video. Contact information for the stars and video production teams should be exchanged, in case of unforeseen schedule changes. Finally, ensure that all stars sign consent letters (Appendix 9) to prevent later misunderstandings.

Shooting Videos

After the storyboard has been created, reviewed, and approved for technical content, you can begin shooting the video. All necessary equipment, props, and schedules should be arranged in advance by the video production team. The team consists of:

  • A camera operator, who directs the production following the storyboard. He or she handles the camera and makes the actual recordings.
  • A facilitator, who helps actors during the filming of the scenes to ensure that the content described on the storyboard is covered. He or she plays the role of an interviewer by asking probing questions, fills the gaps during moments of silence, and makes the star comfortable on camera. The facilitator should allow video stars to speak as much as possible and should provide input only when necessary. In the videos, local stars are meant to communicate information authentically in a way that the community can identify with.
  • Other crew members should provide lighting and sound support, as necessary or available.

Required tools and equipment for shooting include:

  • Approved storyboard.
  • Copy of the POP for technical reference.
  • Camera—fully charged.
  • Memory card with sufficient free space.
  • Wireless microphones—one at minimum, but two for optimal audio quality, providing the camera can accommodate more than one (using a splitter if necessary).

Project Experience: Challenges of Nutrition Videos

There are certain challenges related to video production for nutrition videos as opposed to agriculture videos that were identified through the SPRING/DG project. To articulate abstract concepts related to nutrition, the videos often require more than one actor, which necessitates that the team have more than one microphone or that the actors share microphones within each scene, which can be difficult to handle. Additionally, because many nutrition behaviors happen in the home, as opposed to the fields, low lighting can make shooting video difficult.

Immediately after shooting, the video production team should debrief the video stars. It is critical at this point to convey to them that being in the video has made them role models in their community for the featured behavior and that they should be promoting and practicing the behavior themselves at all opportunities. Part of the success of the community-video approach relies on social pressure and trust within the community, so that neighbors and peers can see that the stars are, indeed, effectively practicing the desired behavior, with the implication that it is possible for other community members to do so as well. This reinforces the importance of production teams’ careful selection of early adopters or stars that are likely to be able to maintain these behaviors, because unlike other video interventions, this approach is based on social engagement and identification of practitioners and role models from within similar communities. If the positive deviants or actors are seen not practicing the behavior that they were modeling in the video, the approach is at risk of being undermined in the community.

For more information on shooting skills, shooting protocol, decorum during shoots, handling of camcorders and their accessories, and prerequisites for shooting, refer to the DG video production training manual and the DG SOP.

Video Editing

Once all video shooting is complete, you can begin the post production process or video editing phase with an identified video editor as part of the video production team. The process of producing videos scene by scene and maintaining storyboard integrity helps to reduce the time and effort needed for editing. The editing phase includes:

  • Rearranging, adding, and/or removing sections of video clips (“stitching”).
  • Adding and/or removing audio.
  • Applying color correction, filters, and other enhancements.
  • Creating transitions between clips.
  • Adding annotations, inserted at appropriate intervals during the videos, to emphasize important points, summarize information, and provide mediation clues to the facilitator.
  • Adding photos or other teaching aids between clips as necessary.

Where several clips have been shot for each section of a storyboard, as often happens, it is important to watch all clips, choose those that are likely to be used, and organize them properly for easy retrieval and arrangement.

Refer to the DG training manual on video production for details on the step-by-step process of video editing.

Read the next section

2.3 Quality Assurance

Pretesting Videos1

Pretesting is a process for determining a target group’s reaction to, and understanding of, behavior change information before materials are finalized. Pretesting tells you whether messages and materials are appropriate and effective.

Pretesting with your target group can tell you whether the language, pictures, music, and messages in your materials are:

Tools
Appendix 10: Video Pretest Facilitation and Reporting Guide Template

  • Understandable.
  • Culturally appropriate.
  • Believable and realistic.
  • Acceptable to the audience.
  • Visually appealing.
  • Informative.
  • Motivational.

How to Pretest Videos

After videos have been shot and edited, pretest them with one or two village groups or organizations comprising similar target audiences in a random, nonintervention village of the same district. If no village groups or organizations are relevant, pretest with a different dissemination group each time or with groups created specifically for pretesting and not included in any intervention-related research. If no research is being conducted as part of your intervention, pretest with a different community group each time to ensure that more than one group sees videos before they are finalized. The pretest should be conducted just like any other dissemination, following the dissemination guidelines below. One or two staff from the local partner organization should be present to document the proceedings using the pretest facilitation and reporting guide found in Appendix 10.

Production teams should use feedback from the pretested group to make necessary further edits to the video to ensure that the material will be well understood. Edits may include changes to annotations, audio dubbing to clarify certain concepts, adding pictures or new scenes, or even reshooting scenes if necessary.

In addition, pretesting allows you to understand the types of questions that may arise during screenings and to prepare accordingly. Ensure that the supervising team member notes all questions asked during pretesting. Feedback and questions from pretest groups can then be analyzed and discussed in the dissemination preparation meetings with mediators. This will help them to clarify key concepts from the videos and adequately prepare to answer questions that will likely come up in their disseminations.

Technical Reviews

Before you disseminate a video, technical and aesthetic quality approvals are required. A partner’s quality assurance team or managers and technical experts should analyze both the technical accuracy and completeness of the content as well as the aesthetic visual, audio, and motivational aspects of the video. Based on the comments given, the video should be further modified or revised (or rejected) before dissemination.

A feasible process for approvals for storyboards and videos should be carefully defined. For a sample review and approval process for storyboarding and video production, one used during the SPRING/DG project, see Appendix 8. As noted earlier, this sample illustrates an extensive review process by the global technical partner in the absence of a local nutrition technical partner to conduct the review. If the technical reviewer speaks a language other than the one in the video, draft subtitles to accompany the video to aid in the approval process. The subtitles themselves should be vetted and approved by technical partners within the process recommended above. They can then be uploaded with the video to facilitate global understanding and showcase the work for donors and other partners.

Video Storage

Once video editing and review are complete, store the final videos in a format compatible with the pico projector used for dissemination. Upload the video details in DG’s Connect Online, Connect Offline (COCO) system, or other data collection software, and upload the video file itself on YouTube. Add subtitles via the YouTube closed-captioning feature. Then copy approved videos onto pico projectors or micro SD memory cards for dissemination in intervention villages during regular dissemination preparation meetings with mediators. More details on this step can be found in the DG SOP.

Tips: Common Myths about Pretesting

Pretesting is too expensive and time-consuming.
By ensuring that the audience understands the content and adopts the desired practices, pretesting can save you money and time. For each video, only one or two groups need to pretest the content. Simple changes can be made to enhance comprehension.

Content developed from local staff members does not need pretesting because they are part of the local community.
Even local staff can have preconceptions or biases. They may also have a higher literacy level or greater understanding of technical content than target audiences. You should strive to pretest all content with the specific target audiences and in the specific contexts where you plan to use it.

Only written materials need to be pretested.
All types of SBCC materials benefit from pretesting: words, illustrations, photographs, videos, music, and graphics. If people do not like or cannot understand the videos or graphics, the message can easily be lost.