Introduction
The Importance of High-Quality Visual Images
High-quality images have become an essential component of social and behavior change. They are especially critical in the print materials we develop for use in low-literacy or multi-language settings where written words are often barriers to communication. Visual images can stimulate interest and curiosity, capture attention, communicate difficult concepts, and add context. They also help to ensure both the comprehension and credibility of the information or messages being conveyed. Often, we rely on images to model a behavior and to motivate individuals, families or communities to try a new behavior and, ultimately, to adopt the behavior or behaviors we are promoting.
Visual aids with high-quality images also convey a professional look which helps target populations to trust the information and encourages them to accept the messages as important and valuable to them. High-quality images can present complicated ideas quickly and succinctly to a wide population, and can effectively supplement (or even replace) written materials. In areas with low rates of adult literacy or messages for children, high-quality images are essential catalysts for information sharing, often required for behavior change.
Purpose of This Guide

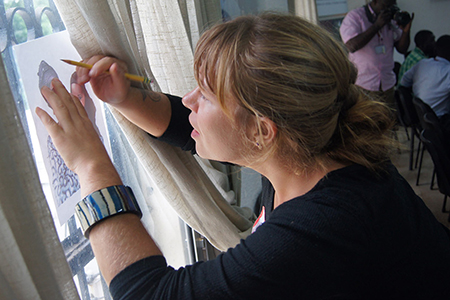
This Photo-to-Illustration (PTI) Guide highlights a specific technique for creating high-quality illustrations through a process involving tracing a reference photograph and then scanning and importing the resulting line drawing into the computer to add color, shading, and patterns. The PTI Guide is designed to orient social and behavior change (SBC) managers on the basic principles involved in the PTI process and the benefits of using this technique in developing visual materials for nutrition and other SBC programming. Additionally, it aims to provide a general overview of various PTI-related resources that SBC managers may need in order to procure and incorporate high-quality illustrations into their communication materials and intervention programs.
Context of This Guide
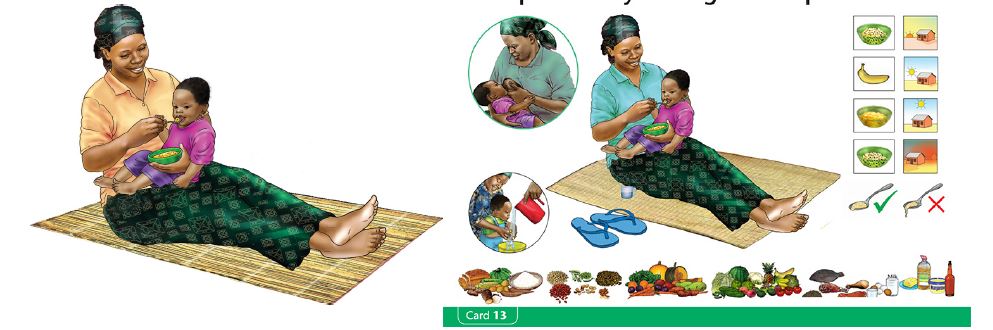
The PTI Guide serves as a complement to the Community Infant and Young Child Feeding (C-IYCF) Counselling Package, a comprehensive global resource developed by UNICEF for the promotion of key nutrition practices. The C-IYCF Counselling Package provides nutrition stakeholders with several tools, including a generic set of counselling cards and take-home brochures containing high-quality images and evidence-based key messages. An adaptation guide is also included in the package to help stakeholders tailor the entire package to their specific national policies and cultural context. The technique presented in the PTI Guide expands upon the basic steps for the PTI process for developing illustrations outlined in the UNICEF adaptation guide. (For more information on this package, please see Appendix 1.)
The USAID-funded Strengthening Partnerships, Results, and Innovations in Nutrition Globally (SPRING) project has created several additional resources to complement the PTI Guide and the C-IYCF Counselling Package. First, SPRING has created the Photo-to-Illustration Tutorial, a video which explains the PTI process. This video uses a real-life example to capture the steps involved in creating an illustration with full volume and colors.
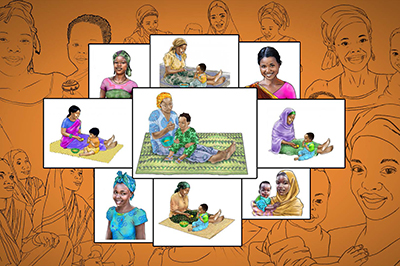
A second resource, the IYCF Digital Image Bank, was created through a partnership between SPRING and UNICEF, and provides a growing repository of images created using the PTI process. The IYCF Digital Image Bank contains over 100 images from the generic UNICEF C-IYCF Counselling Package, as well as several adaptations of this package that were created for specific countries and contexts. Users are encouraged to download, use, and adapt these images for non-profit SBC purposes, as appropriate, or they may also serve as a reference point for your team to adapt or create new images for your program. (Please contact SPRING at info@spring-nutrition.org if you would like to contribute images to the bank for use by others working in nutrition SBC.)
How to Use the PTI Guide
The PTI Guide reviews the process of creating high-quality images, beginning with the initial concept development of an image, and then through the process of photography, illustration, editing, testing, and adaptation. By detailing the steps of the process, we hope that SBC managers can gain some insight and appreciation into the time and resources required to create a high-quality illustration. Additionally, by understanding the capabilities of artists and the power of image-editing software, SBC managers will be able to more effectively direct and guide artists to achieve the high-quality images needed for effective communication.
Secondly, the PTI Guide may be shared with graphic artists as a “primer” for the type of graphic work you are looking for, but is NOT meant to provide a complete graphic design training on the photo-to-illustration technique. However, a graphic artist who has professional skills in both illustration and image-editing software may find the PTI Guide useful in understanding the techniques of the PTI process. More detailed steps for graphic artists can be found in the Photo-to-Illustration Video Tutorial.
Additional resources in the PTI Guide include tips for SBC managers on incorporating this process into your program, including overviews of budgeting for this work, incorporating the process in your work plan, contracting an artist, and working with artists.
The PTI Guide does not cover the process of creative layout of illustrations for print or digital materials. This is because layout needs vary greatly across interventions, and often require a different set of creative skills.
Planning for Illustrations
Before developing illustrations, SBC managers must have a clear idea of the type and scope of the work they need done, as well as the way these images will be used (for example, in a brochure, a set of counselling cards, or as visuals for a web page.) Additionally, before identifying and contracting the right artist or artists to complete the required graphic work for an SBC material, managers should ensure that their programs have the necessary resources to plan and execute the materials appropriately. The following sections include some recommendations and things to consider when planning for illustration work and engaging artists.
Choosing an Image Style
There are many types of visual images, including simple cartoons, photography, and realistic illustrations (which can be created using the PTI process). There are advantages and disadvantages to each, and an appropriate use for each in SBC materials. Let’s take a moment to look at three types of images and review some of the benefits and challenges to using each one.
Cartoons or Clip Art
Many social and behavior change programs use simple line drawings, cartoons, clip art and icons for visual materials. These may have the advantage of being quick to produce, can be relatively inexpensive, and often have a specific appeal to certain populations.

When your intervention directly focuses on young children, it may be best to select a cartoon style, since well executed cartoons may be more attractive and engaging to young audiences.
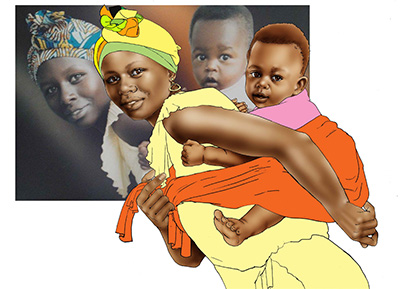
Additionally, cartoon-style images are the easiest medium to convey fantastical or exaggerated ideas for effect. The figure on the right shows an SBC manager with stacks and stacks of unused materials, which would be hard to reproduce in a realistic setting.
There are, however, some disadvantages to using cartoon-style images. These types of images generally have less detail, and so the information or messages may not be clear. Cultural details are often left out of cartoon images or lost completely. As a result, communities may not identify with these images, or may respond to them in an unintentional way. Line drawings, or drawing in a caricature style, often leave a lot of room for interpretation, and the style of the artist may or may not translate well across cultures.
Photography
Photography has the advantage of being relatively fast and inexpensive to produce, especially if only a few images are needed. This is usually an accessible approach for projects, as cameras are widely available and staff can often be trained to take photographs. When staff is properly trained in photography, there may not be a need to contract an illustrator or graphic design specialist.
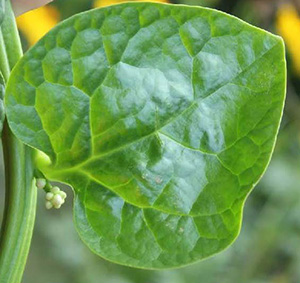
One distinct advantage of photos lies in the level of detail a photograph can provide. For example, the photo to the right shows a plant by the shape of its leaves. A realistic illustration of these leaves may be difficult to achieve and may therefore be less identifiable by the target audience or community. When very specific information is required, a high-quality photograph ensures the most accurate representation.
Additionally, photographs can more accurately reflect the community setting. When photos are taken in the area where your intervention is targeted, they automatically capture the scene and cultural context.
However, there are distinct disadvantages to using photographs. Without careful preparation, photos may include accidental or unavoidable conflicting information or distracting elements. If images are found to be inappropriate or deficient after review by technical staff and/or after pretesting with the target audience, reshooting can be very expensive and may also results in errors of continuity (e. g. people wear different clothing and hairstyles from one day to another, and household or community scenes often change) . Additionally, photos cannot easily be adapted or touched-up based on feedback, and are usually difficult or impossible to adapt to other cultural settings, therefore limiting their use. There are also privacy considerations with using photographs of real people, especially for sensitive content.
Photo-to-Illustration Process (PTI)
The PTI process, highlighted in this guide, has the benefits associated with high-quality photographic images but the flexibility and adaptability of line drawings or illustrations. This graphic technique involves first creating a line drawing by tracing a reference photograph to capture the key proportions and other elements found in the photograph. The resulting line drawing is then scanned and imported into a computer program, such as Photoshop, where the image can be manipulated and transformed into a realistic illustration using the various tools available in the computer software. (Additional examples of illustrations created using the PTI process are found in Appendix 2.)
Illustrations created using this process can easily capture the cultural context, provided that the reference photos capture that as well. They can also reflect a high level of detail when compared to most cartoon-style illustrations.
Furthermore, once they are created, illustrations of this type can be easily edited according to feedback from technical experts and the target audience or community. Using the PTI process, artists can remove distracting elements and adjust or enhance other physical details. Many images can be easily edited or adapted to other cultural contexts, by changing hairstyles, skin colors, or clothing, without necessarily needing to recreate or reshoot a model or scene.
| Style | Cartoons or Clip Art | Photographs | Photo-to-Illustration |
|---|---|---|---|
| Common Advantages | Quick to produce and simple to adapt | Quick to produce and captures cultural context | Easily adaptable, and captures cultural context |
| Common Disadvantages | Generally, has little detail and is easy to misinterpret | May inadvertently display incorrect information. Can be expensive to make changes if feedback requires reshooting | Requires using artists with this graphic skill |
| This style may work best in these situations | When developing print materials for young children | When very specific details need to be conveyed | When your intervention or materials may be scaled, expanded, or adapted to other settings |
The chart above provides program designers with a quick guide for choosing a style for their visual materials. Designers may choose to incorporate several styles into their materials to best convey the key messages to the intended audience.
As a complement to the UNICEF C-IYCF Counselling Package, one objective of the PTI Guide is to expand upon the basic guidance on the PTI process first presented in the adaptation component of that package. As such, while all three styles can be used in developing high-quality visual SBC materials, the remainder of the PTI Guide focuses only on the PTI process. You may, however, find that much of the guidance provided in the following section can be applied to developing images in the cartoon or photograph styles as well.
Introduction to Graphic Design Files
To begin, it is important for SBC managers to have a basic understanding of graphic design and the final products (i. e. image files) one should expect from the artist.
Many artists should now be able to deliver their final products in digital format, by importing their hand-drawn illustrations into a graphic design program for further editing. Some artists now exclusively use digital drawing pads, which allow them to draw directly in graphic design programs. Even artists who strongly prefer to work with pen and paper may scan their images into the computer and do some basic cleaning of the scanned file before submission.
Final images may be delivered to the SBC manager in a variety of digital image file formats, which can be divided into two categories: flat and layered images.
Flat Images
Flat images come in several file types, including JPG (or JPEG), PNG, and BMP. These file types may differ in image quality, file size, and minor features, but all are “flat” images. This means that the images are simple and include only the lines and coloring that are visible in the image. To make an edit to a flat image, the artist would have to erase a section and redraw or recolor it.
Flat images are best used when sharing an image for comment from remote members of the team, and when it is time to lay out an image in a print or website format. They are not very useful if you need to edit the image or create adaptations for other materials.
Layered Images
Layered images are image files created using computer graphic programs such as Photoshop, that are made up of several different layers that together create a single illustration. You might think of them like a set of paper dolls, where each item of clothing is like a layer in the file that can be added to create a variety of final images. In your graphic design software, you can “toggle” a layer on or off to show or hide it, resulting in variations of an illustration without having to recreate the entire image. A single image file may have many layers that can be mixed and matched to create multiple final images from a single file.
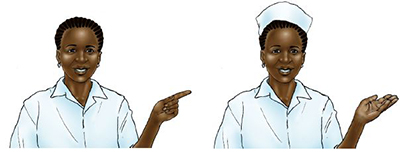
Unlike paper dolls, layers are not limited to articles of clothing. In the example on the right, the two nurses are taken from the same layered image file. The woman’s face and body are in one layer, and her hat is in another. By “toggling” the hat layer on or off, different images of the nurse can be created easily. The nurse also has a third layer -the pointing hand. By “toggling” that layer, the nurse’s hand changes from open to pointing. In this way, a single image of a nurse can be created and easily “tweaked” in different ways, allowing different effects for use in different materials.
Using this layered illustration method and some careful planning, the possibilities are endless. Different layers can be added to the above image to change her uniform style or color, her hairstyle, facial expression, or skin tone. Adding each of these layers still preserves the original layers, so anything that is added can be “toggled” off to return to the original image. This is helpful when making edits and adaptations to images, as the artist does not have to start from scratch for each addition or removal of an element.
Layered images may be saved using several file types, such as TIF or PSD, which may require a professional graphic design program to be able to open and fully manipulate later. Because layered images may contain dozens of layers, they are usually much larger than a flat image and cannot easily be used in a document without converting to a smaller size. For example, the average size of a layered image in the IYCF Digital Image Bank is 37MB. However, these files may be converted at any time to a smaller (1MB), flat image using a graphic design program. This process, called “flattening,” removes the invisible layers and merges visible layers into a single layer or flat image. It is always best, therefore, for the artist to work in a layered image, but then share flattened copies with the team for review. Once the team has given their feedback, the image can be edited and finalized in the layered version, then copied and flattened again for use in layouts. It is important to remember that you cannot “unflatten” a flat image and restore its layers, so always keep a saved copy of your layered image for future adaptations. SBC managers will need to plan carefully about how to transfer and store large files containing layered images, since even a single layered image can be too large to send over email.
Budgeting for Illustrations
When budgeting for the development of illustrations for SBC materials, it is important to remember that images are a critical component of your design. As such, it is important to allot sufficient time and money to plan and develop high quality images. Many program designers invest considerable resources in research and consultative processes to develop key messages for their program, but neglect to plan for and invest in the development of professional images and high quality graphic layouts to convey those messages. A program’s visual communication materials are often the main medium through which a program engages with the community. By investing in these visuals, you are investing in your program.
Artist’s Time
When budgeting for an artist’s time, there are several factors to consider. SBC managers should take account the size and complexity of the visual materials or package of materials needed, and the corresponding complexity and number of images needed for each element of the proposed package. Ideally, SBC managers should communicate their ideas about illustrations and other visual concepts to artists as early as possible in the design process. Using or adapting existing images can save time and money. The IYCF Digital Image Bank, described in Context of This Guide, is an important new open-access resource worth exploring. It includes over seven hundred high quality illustrations focused on maternal, infant and young child nutrition and hygiene.
Once design and image concepts are selected, and the size and complexity of the work is defined, artists will be able to give more precise estimates of the time needed to execute the work. As SBC managers and artists develop a collaborative relationship, and experience working together, managers themselves will gain a better sense of the time and effort needed to create the required images.
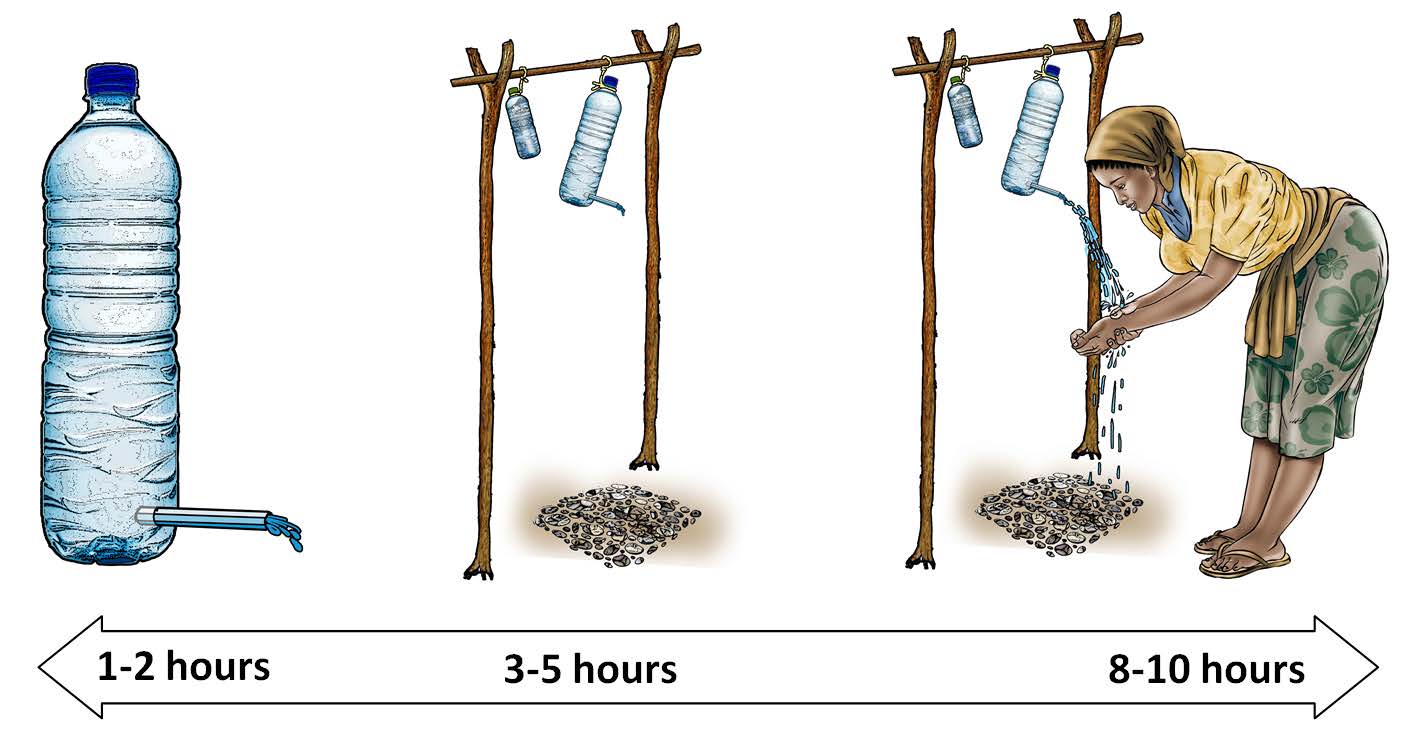
As an example, each of the three illustrations could be used to portray a tippy tap. However, each illustration requires a different amount of time to complete. When designing a series of images and estimating the time involved in developing illustrations for that series, SBC managers should think carefully about the complexity of the different elements they envision.
Finally, the SBC manager should allocate time needed for technical review and feedback, and the revisions that may result from this process. Whenever possible, the SBC manager should develop a contract with the artist that has the flexibility to include edits and multiple rounds of review and iteration.
Design/Layout
In addition to the complexity of the illustrations, the SBC manager must consider the complexity of the design or layout of the document or documents where the images will be incorporated. If images require placement and arrangement in complicated documents, such as brochures or posters, this may be beyond the skill set of your illustration artist. In these cases, SBC managers should consider hiring an additional graphic artist who specializes in layout. Depending on the talent and experience of a given artist, he or she may be able to provide recommendations and guidance about options, but often the initial design decisions concerning the format and number of materials to be produced come from the SBC manager or project team. SBC managers can often find ideas for illustrations and layout in earlier project materials.
Budgeting for Printing
Expert Tip
Don’t forget to include costs for taking reference photographs and for pre-testing during the materials development process. Often these activities can be carried out by field staff, or conducted during other project activities.
Hiring Artists
When searching for artists to illustrate your images using the PTI process, be clear about the type of illustration you are looking for. Not all artists are interested in or capable of changing their artistic style to match your assignment. Other artists may not recognize the process by its name, but have the necessary computer graphic skills to produce illustrations for your materials.
To communicate your expectations, use existing illustrations that have been created using the PTI process as examples, and provide the artist with the actual reference photography, if it is already available. It is also a good idea to show potential artists the PTI Guide and/or the accompanying tutorial video. (Appendix 3 provides specific guidance on creating a scope of work or terms of reference for an artist.)
When contracting with an artist, it must be made very clear that the PTI process is an iterative one. It is rare that a first draft of an image is approved without at least minor changes. Often, many images have significant changes to properly capture and convey the proposed technical or cultural information to the community. Some artists may be resistant to a process that involves revising their artwork, but being open to feedback and being willing to make changes to works are necessary attributes of an artist involved in creating effective final illustrations.
Ask for samples of the artist’s work in the PTI or similar “realistic” style. Some artists may be willing to create a sample if they don’t currently create images in this way.
The best working relationships between artists and SBC managers are those that respect the technical expertise that each individual brings to the table. The graphic artist is a technical expert in visual media. He or she can provide valuable insights into how to best translate concepts to imagery, adding advice on the position of subjects, the perspective of the illustration, and many other aspects that a non-expert may not even consider. There will be instances when the SBC manager needs to be very specific to convey technical information with the artist and other times when the SBC manager must rely on the artist’s expertise in conveying an image that is appealing to a wide audience.
Time Management for Illustrations
When planning for illustrations for a given project, it is a good idea to include the artists in the discussions as early as possible in your timeline. This allows you to share the program’s needs and get feedback from the artist as plans are developing. The artist will then have a better idea of the scope and timing of the work. SBC managers and graphic artists should have frequent discussions about the estimated time necessary to complete the work, and include that information in the budgeting and development of the scope of work. Whenever possible, it is best to define the full package of images needed, and including them together as one scope of work. This way, artists can review the entire set of images and identify elements (people, objects, settings) that may be useful in other illustrations or repeated in different materials. By making strategic decisions in this way, artists may be able to save time and avoid having to create entirely new illustrations.
Finally, a realistic schedule for image development should always include some buffer time for several rounds of feedback and revision during the drafting process (following technical or content expert review), and again after pre-testing with the target audience to assess comprehension and cultural appropriateness.
(For additional guidance on tracking the image development process and/or requesting changes from artists, please see the sample revision tracker in Appendix 4.)
Steps in the Photo-to-Illustration Process
Equipment and Other Resources Needed
The basic equipment and other resources that artists will need for the PTI process include: a printer, light table, scanner, computer, and graphic software program.
The “traditional” method of the PTI process involves printing the reference photograph, and then using a light table to illuminate the page while tracing the image to create a line drawing. The tracing is then scanned and imported into a graphic software program (such as Photoshop) in the computer. In low resource settings, where a light table is not available, the artist may hold the image against a well-lit window to trace it.
Some artists may use touch-sensitive drawing pads to draw directly within their image editing software. This equipment eliminates the need to print, trace, and scan images, and often results in cleaner line drawings that don’t need as much cleanup during the editing phase.
Graphic artists also need a computer with at least 4GB of RAM (preferably 8GB) in order to properly run the graphic software program.
There are many image-editing software options available at varying costs; Adobe Photoshop is the best-known. These are powerful programs that artists can use to easily create complicated images, and they allow for greater manipulation of the image. When artists work in programs like Photoshop, they often work in layers, where each layer represents a single element of an image. This is useful for making slight modifications to an image, or for copying elements from one image into a new illustration.
This section describes the PTI process, from conception of images until a completed illustration is ready for layout. These steps are an expansion of the steps as detailed in the Adaptation Guide of the CI-IYCF Counselling Package, which we have reproduced as Appendix 5. While SBC managers are only directly involved in some of these steps, it is important that managers understand the full processto help to underscore the power of the technology in the PTI process and the added value of this tool for creating illustrations. This knowledge will help in trouble-shooting and avoiding bottlenecks during production and adaptation later.
PTI Steps include:
- Concept Development
- Reference Photography
- Selection and Preparation of Photos
- Pencil and Ink Tracing
- Cleaning Line Drawing in Photoshop
- Adding Flat Color
- Creating Creating Volume
- Adding Patterns
- Other Elements
Concept Development
Planning and identifying the images you need should be based on the objective of your SBC material(s), the key messages that the images will communicate, a clear understanding of the culture and context where they will be used, and the ideas and experience of the project team and artist. This guide does not go into specific detail in the steps involved in developing SBC messages.
The project team must decide on the “look” and priority of the images needed for each material. If time and resources allow, concept testing with your target audience to help define the images is often very valuable. During this process, it is always a good idea for SBC managers to include the artist in these discussions about prioritizing images and concept testing. Their experience in defining the look of graphic images can be invaluable.
During concept testing, a team conducts qualitative research with a small group from the target audience. Using key messages and rough sample illustrations, the team can receive useful feedback on what approaches do and do not work before investing the time in developing materials. For more information on concept testing, see here.
Use examples of existing materials as a starting point. Examples can be an inspiration for your design, or you may even decide to adapt existing images for your context, from sources such as the IYCF Digital Image Bank, which includes high quality images for download free of charge. The IYCF Digital Image Bank can be found here.
Reference Photography
Once the team has a clear concept for any new images needed for the proposed material(s), reference photographs are needed. While it is nice to have very high-quality photography using an expensive, full-frame SLR camera, these are not required. Simple point-and-shoot cameras or even smartphones can provide photographs of sufficient quality to use in the PTI process.
Anyone on the team can take on the role of photographer, if two requirements are met: First, the photographer should know some basic techniques in photography, including lighting and framing. Second, the photographer must have some technical knowledge of or support from technical specialists about the concepts and key messages being promoted. Without that knowledge or support, your photography (and the resulting illustrations) may depict information that is inaccurate or not recommended. Often, photography sessions are held by teams of two: one person who has photography skills, and another who is focused on accurately capturing the technical content of the messages, who can assist in setting up and “staging” the photographs.
Ethics and the PTI Process
Although the end result of the PTI process differs greatly from photography, the ethical considerations of using models for images do not. Your program should take great care to treat your models in an ethical way.
You should make sure that your models are aware of the purpose and use of their photos and the ways they will be used. Models should be presented with examples of photographs, tracings, and final illustrations so that they understand how their photo will be manipulated and that they may still be identifiable at the end of the process.
Give models a clear explanation of the topic their photos will promote, particularly if it is sensitive in nature (such as HIV, family planning, etc.) If your program plans on creating several adaptations from one photo, explain this to the model as well. A model may reject the use of his/her image for audiences from another culture or for any reason, and these wishes must be respected.
Of course, it is not possible to predict every use of a photo, especially when your program may need to adapt an image long after its reference photo was taken. Even so, every effort must be made to ensure that a model's rights are protected.
Lighting
Standard photographic lighting techniques should always be used. It is best to take photos in a bright area, where shapes and forms are easily distinguished. Lighting directly above the subject (for example, bright sunlight in the middle of the day) or artificial lighting can often cause harsh shadows that make details difficult to see. Avoid placing your subject immediately under the light, and use natural lighting whenever possible. Good lighting can especially be found during the early morning or late afternoon, or on a day with light cloud cover. Make sure your subject is not lit from behind, as this generally darkens many features of the photo and makes forms harder to distinguish.
Selecting Your Model
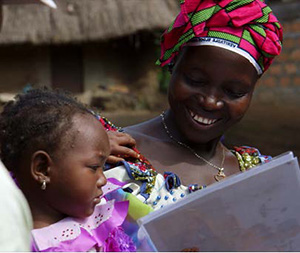
If possible, select a model that closely fits the culture and context for your image. For example, if you are creating visual materials for a target audience of young mothers, choose a young mother from the community. Ensure that the model understands the intent for the photographs being taken, and that they have given their permission to be photographed.
Encourage the model to wear culturally appropriate clothing, and select relevant objects and other props that people in the community have available and can identify easily. Even though clothing and other elements can be modified, refined or even replaced in the PTI process, the closer your reference photos looks to the desired end-product, the easier it will be to produce a high-quality illustration.
Positioning the Model
Your photographic model or models should hold natural poses for each photo. That said, sometimes small adjustments need to be made to natural poses to correct the perspective of the image to ensure the accuracy and clarity of the final image. For example, when working with a mother breastfeeding her child, the photographer should ensure that both the mother and the child are in correct and comfortable positions, and that the baby isn’t hidden by a blanket or the mother’s arm. Taking time to position the model will help to ensure that the image clearly reflects the behavior you are trying to promote. It is recommended that the photographer shoot the same photo from different angles, providing multiple reference options to find the best way to present the image.
While taking photos, the photographer should actively and continuously communicate with the models to make them comfortable with the process and to find the best poses and angles that most clearly convey the desired behavior or reflect the key messages. Many people may not feel completely at ease during a photo shoot, and the photographer should make every effort to maintain a comfortable and collaborative environment. Always thank the models for their participation in the project.
Framing the Photograph
When taking photos of reference models and props, it is important to take photos in full-frame -that is, showing the models’ entire bodies or the entire prop. Close-up photographs of important additional details should also be taken. Full-frame photos are usually the most useful, as they give the most information to illustrators. If all the shots taken are framed too closely, and it is decided later that a wider frame is necessary, these photos will not be available. An illustrator can always create a close-up illustration by cropping a full frame image.
Angle
As mentioned before, the angle of a photograph can be critical to properly convey key messages. Careful consideration should be taken, therefore, in selecting the best angle. For example, when trying to convey nutrition information, a photo taken from directly above a bowl of food may be the best way to highlight dietary diversity by highlighting a variety of foods in the bowl. This angle may not be the best way to capture the appropriate quantity of food, however, as an angle from above flattens the image and does not show the depth of the bowl. A picture taken from a side angle might show both the contents and give a better idea of the amount of food in the bowl. When taking photos of several independent elements (like bowls, shoes, mats) that will be combined in a scene later, make sure that each item is photographed from the same angle. If not, the different perspective of each element will make the scene look awkward.
Supplemental Photography
After your principal photos have been taken, if time and resources allow, it is a good practice to take additional reference photographs. These photos may capture valuable information about typical scenes in a community, or may highlight specific activities, models, props, or locations that can be incorporated into an image later. These supplemental photographs can be used as references for enriching illustrations. Some suggestions to consider when taking supplemental photography are:
- Shoot individual elements or props from multiple angles, such as any tools or equipment necessary for the key message being demonstrated;
- Shoot a variety of background elements, such as houses or trees, from the same and additional locations;
- Shoot individual models from different angles and in different positions;
- Shoot a variety of facial expressions of your models;
- Shoot examples of different clothing patterns, styles of clothing, and hairstyles found in the community.
Selection and Preparation of Photos
Once photos are taken, the artist and the team must decide which reference photos to use to create the illustration. Selected photos should reflect the proper technical content (as advised by the SBC manager), and capture the content in a visually appealing way that can easily be converted to an illustration. (The artist will have helpful input on this perspective.) Sometimes, the team may like elements from several different photos, such as the facial expression of the model in one photo and his/her hand gesture or posture in another. This is another advantage of the PTI process, since multiple elements can be combined into one illustration using Photoshop later.
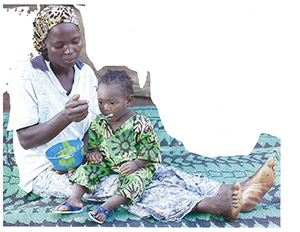
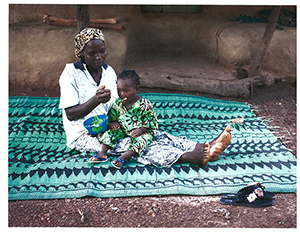
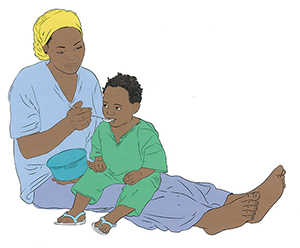
Once the photos are selected, the artist will prepare them for tracing by cropping out unimportant elements of each photo and adjusting for brightness and contrast to make tracing easier. The artist may also make small edits to elements of the actual photo, to improve the final illustration. In this example, the child’s head appeared too low, so a small but important adjustment was made in Photoshop. The artist would then smooth out the changes during pencil tracing.
It is best for the artist to trace each person or object separately if there is time. This can save time and the expense of later making modifications to the images. For example, in the image above, it would be best if the mother and the baby could be traced separately, which would require the artist to draw the mother’s lap without the baby in it. Later, if the team needs to make a change to the baby’s position, the artist will not have to go back and fill in the mother’s lap. Drawing models and props separately also means that they can be reused more easily in future illustrations.
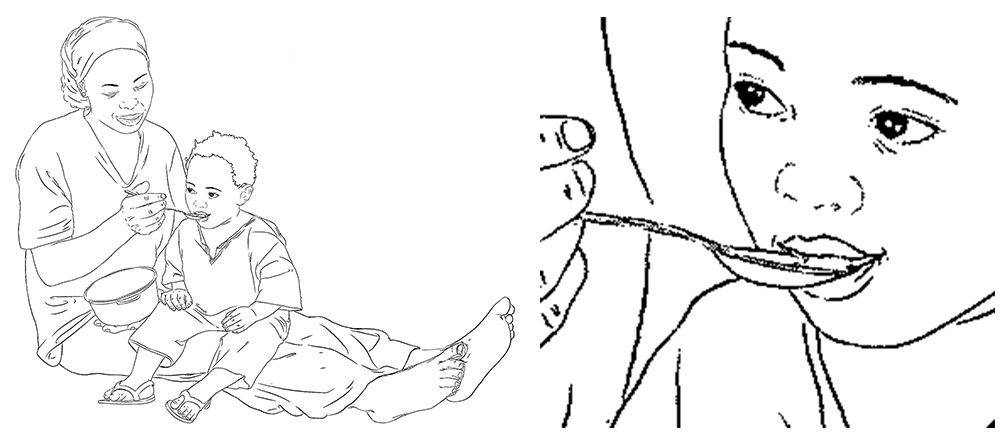
Pencil and Ink Tracing
Once the photograph is printed, it can be traced on a light table, using sharp pencils on the back of the printed image, or on a blak page placed over the reference photo. This is perhaps the most challenging step, as selecting the best lines to highlight from a photograph requires some artistic knowledge and experience. Many artists now choose to draw using a digital drawing pad, which allows the artist to complete the line drawing directly into Photoshop. If a light table or a digital drawing pad is not available, a printed image can be held up against a glass window to trace.
Artists may have to fill in some sections of the tracing using their own imagination, if the lines are hard to see. Additionally, some small adjustments can be made to make the line drawing more appealing, such as adjusting the position of an arm or a leg, or eliminating an unwanted element. For example, a frown can be turned into a smile, or a lollipop in a child’s hand can be turned into a toy.
The artist should ignore background elements during this step, and only trace the most discrete lines from the photo. Some lines must clearly be drawn, such as the outline of a model’s body or his or her clothes. Other areas of the illustration may not need any lines; a classic example is a model’s nose, which often does not have any sharp edges. Rather than draw a ridge down the middle of a model’s face, the artist may choose to draw only the model’s nostrils. The shape of the nose can then be created by adding highlights and shadows (see the section on Creating Volume.) If necessary or desirable to complete the scene, background elements can be drawn as a separate image file, and added into a scene as a separate layer.

It may be necessary for the artist to retrace the illustration in ink to guarantee strong lines. Alternatively, pencil lines can be cleaned up in Photoshop after scanning. Many artists prefer inking because the lines are more precise. When inking, it is best practice for the artist to make sure that lines connect and that there are no gaps in the lines. This will make adding color easier in later steps. Different size pens, creating different line “weights” can add detail and effect to the ink tracing. Small details, like eyebrows, eyelashes, lips and teeth should be traced using superfine pens. After inking, the artist should erase pencil marks and smudges as much as possible for a clean image.
Once the image is traced and extra lines are erased, the tracing is ready for the artist to scan, import into the computer, and clean up further in Photoshop. At this stage, the artist should send the illustration to the technical team for feedback or pretesting in the community. (See the section on Technical Review and Feedback.)
Cleaning Line Drawing in Photoshop
While this step can be time-consuming, it is crucial for a high-quality image. Digital scans, even very high-quality ones, require some editing to remove additional smudges, eraser marks, or random lines. Proper cleaning can give a final image a professional look. Additionally, a clean image makes the following steps much easier to manage. Some artists may want to clean up line drawings by using image filters, a technique in Photoshop that can apply a rough change automatically. However, we recommend that artists manually clean up the lines of the drawing, as the result is generally more detailed and precise.
When scanning the tracing, the artist should select a high-resolution scan setting (at least 300 DPI) to ensure high quality. We recommend scanning in color, even if the line drawing is in black and white. A color scan contains more detailed image data, and can be manipulated more easily than a grayscale or black and white scan. Once in Photoshop, the image can be converted to grayscale.

In Photoshop, the artist will increase brightness and contrast in the image, to make the lines stand out clearly and to remove unnecessary markings and information. It is important to note that while this can remove many of the blemishes and unwanted marks, a detailed review of each line is usually still necessary.
After this adjustment, the lines of the tracing should be cleaned up, as they will be pixelated in the scan. The artist should zoom in and use the eraser tool in Photoshop to ensure that the lines have a “smooth” edge. This can take some time but will result in a very high-quality result. During this review, the artist should also inspect each line and ensure that there are no gaps. These gaps should be filled in so that the image can be easily filled in with color later.
If the illustration was traced on the back of a printed photo, the line drawing will be a mirror image of the original photo. If desired, the artist can easily flip the image horizontally in Photoshop, so that the team can compare the line drawing to the reference photo.
Adding Flat Color
Once the line drawing image is cleaned up, it is ready for flat color. Up until now, the artist has been working on the image in a single layer. Beginning with the flat color step, the artist should be working in multiple layers, adding each new color in a separate layer. By working in layers, the artist has the option to quickly replace or change the color and style of any element of the image. If the artist only works in a single layer (a flat image), then it becomes very difficult to separate elements for modification and adaptation later. Please see the sections on flat and layered images in the Introduction to Graphic Design Files. Managers should occasionally remind the artist to check that they are working in layers, since this is often a new behavior that needs reinforcing.
The following steps detail the process that the artist can use to add flat color in multiple layers.
First, the artist should duplicate the layer that contains the line drawing and reorder it to be the top layer (maintaining the line drawing throughout the process as the original layer.). Now, using the magic wand tool in Photoshop, the artist should select the white background of the layer and delete it. The style for this layer should be set to “multiply,” which will help the overall quality of the illustration.
Using the control button and the magic wand tool, the artist should select all areas to fill in with a single color, such as a model’s face, arms, and feet. With all areas selected, the artist should create a new layer to work in. The artist can then fill in the selected areas with the appropriate color. This technique of highlighting a selection in one layer, and then applying color to a new layer keeps every color isolated in a way that can easily be modified later.
The artist should continue this process until all areas are colored in. Each color should be added to its own special layer, and NEVER to the layer of the line drawing.
When choosing colors, it is usually best to choose from swatches in the software program’s preset color palette rather than creating a specific, unique color. This will make it easier for the artist to go back and choose the same color to add to another section, or to another image, if necessary. This is especially important for skin tones, which must remain the same for each individual model across a series of images. Once flat color is added to the image, it is a good idea to export a flattened version of the illustration again for quick feedback from the technical team and/or pretesting in the community. (See the section on Technical Review and Feedback.)
Creating Volume
The next step in this process is for the artist to make the image lighter and darker in different areas to create the appearance or effect of highlights and shadows, which adds depth and dimension to an image. This is referred to as creating “volume” in the illustration. Volume makes the illustration look more realistic and can help community members relate more to the subject of the image.
To get started, the artist can use the original photo as a reference to find where highlights and shadows naturally fall. (This is another reason why the lighting during a photographic session is so important.)
Before beginning, it’s a good idea to duplicate each color layer (creating new layers) before adding volume, to preserve the original flat color image. Volume will be added to each color, one layer at a time.
The artist can apply highlights and shadows using a pair of tools: the Dodge tool (for light), and the Burn tool (for shadow), although the method of using each tool is the same. Using a soft brush, the artist should set each tool to a low exposure (around 10 percent.) The artist can then apply general highlights and shadows first, such as light on a model’s forehead and shadows under the chin. Then, the artist can zoom in, use a smaller brush, and continue with details, like the highlights and shadows around a model’s nose.
Once the task is done, the artist can adjust the brightness, contrast, and saturation of the layer to make the volume effect more or less dramatic. Care must be taken, however, not to exaggerate the highlights and shadows too much.
The artist should repeat the process in new layers with all the colors where volume will be applied, including clothes and objects that appear in the image.
Adding Patterns

After volume has been applied, the artist can increase the quality of the image ever further by adding patterns to clothing. Many artists avoid patterns on clothing, because it can be difficult to match the natural folds of a model’s clothes. Using Photoshop, however, the artist can create a pattern and quickly manipulate it to match the form and even the volume of the clothes of the model.
Creating a pattern is easy. Inspiration can be found from reference photos or by searching the internet. Pattern designs can be made with a simple brush tool, or by using a freely available image.
In a new file, the artist can copy and paste the design repeatedly in a 5x5 or 10x10 grid to create a pattern. The final pattern should be flattened and saved. The pattern can then be imported into the illustration file.
The artist can then position and resize the pattern layer over the desired clothing layer. Using a Photoshop tool called Free Transform, the artist can use the warp feature to distort the shape of pattern to look as though it is printed on the clothes. The layer style can be set to “Overlay” so that the volume that has already been applied to the clothes also appears on the pattern. These two techniques cause the pattern to realistically look like it is on the model’s clothes (while still having the option of removing or replacing the pattern later, as the pattern is in a separate layer from the clothes). After that, the pattern can be cut to fit the clothes layer.
This technique can be repeated with other patterns and clothes.
Other Elements
Once your illustration is finished, the artist can combine different illustrations (i. e. models and props) to make a scene and include background elements if necessary. Artists can also add other objects that they have illustrated in the past and saved as stock illustrations, like a chair or a bowl.
When the draft illustration has been complete and approved, the artist will save a copy and export it as a flattened image.
Reviewing, Testing, and Storing Illustrations
Field Scenario
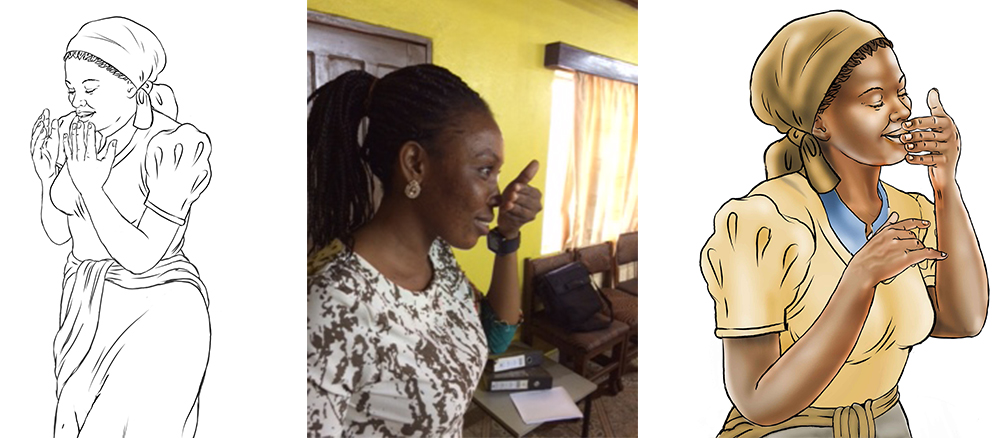
For SPRING’s work on handwashing in Sierra Leone, the team created an image of a woman smelling her clean hands. SPRING tested a line drawing with members of the community in Sierra Leone, who interpreted the image to be of a woman praying. As a result, staff in Sierra Leone requested a modification, and sent a quick camera-phone shot with an alternative position. The artist then developed a new image, which was colored, tested, and approved by the community.
Technical Review and Feedback
Periodically during the PTI process, the SBC manger and other members of the team should review images for technical accuracy. By having regular check-ins between the artist, the SBC manager, and technical or content specialists, the team can avoid investing too much time on an image that really needs to be revised.
When providing technical feedback, it is important to keep two elements in mind: First, SBC managers should ensure that the images correctly demonstrate the technical content accurately. This is a crucial step, as incorrect information may be obvious to the technical team, but the artist may not be aware of these technical issues. For example, an expert in infant and young child feeding can easily distinguish correct and incorrect breastfeeding attachment and positions, while a graphic artist may not. When proposing corrections, it is always helpful for the SBC manager or the technical team to clearly explain the rationale for a recommendation, and to share additional photos as references so that the artist has the information needed to make the necessary adjustments.
Second, SBC managers should review the images with an eye towards ensuring that the program’s key messages are communicated clearly and without distractions. During this review, the manager should ensure that there are no extraneous details that may draw attention away from the key message of the illustration. This review should also consider how the image will be received culturally. This can be difficult to do without involving someone who is from the community for which the illustration is intended. Whenever possible, illustrations should be shared with field staff and, ideally, with community members for their impressions and feedback.
Both elements need to be considered during the technical review. A community may love your illustration, but if it demonstrates incorrect technical information, it will not succeed in facilitating the desired behavior change. Alternatively, an image may display your technical content perfectly, but if your target population is distracted by an irrelevant detail, such as the style of dress in the image, it means that they are not focused on the real messages you are trying to convey.
Field Testing / Adaptation
As with any SBC material, field testing of images is critical for the development of effective materials. Illustrations may be shared with community members for feedback at any point in the process (line drawings, flat color, or final draft product) to get feedback and refine images further. However, these iterations of feedback should not replace field testing, which should take place once images are completed and at least rudimentarily laid out in the materials where they will be used. Field testing may be carried out using qualitative research methods such as in-depth-interviews or focus group discussions. (A sample guide for a simple focus group discussion can be found in Appendix 6.)
Following this process, requested changes are summarized from the field testing notes, are agreed upon by the technical team, and then shared with the illustrator for revisions. It is important for field testers to consider which changes are essential versus non-essential to the comprehension or appropriateness of an image, since all changes have cost implications. Additional reference photographs may be needed. If possible the technical team or field test team should provide those photos to the artist, along with the requested changes.
By using the same PTI process, illustrations can be adapted to a different cultural context. Provided that the key messages in programs are the same, field tests and feedback from program staff and beneficiary communities in a country can provide guidance for adapting the images for other contexts. Again, program designers need to consider what additional reference photography is necessary for the illustrator to effectively illustrate these changes, but a full reference photography shoot is not usually necessary for this step. Once a base set of images are created, further refinements and adaptations can be made relatively quickly and cost-effectively.
The PTI process and the Photoshop software make refinements and adaptations easier, especially if the layering feature is used. By creating different components of the illustration in different layers, aspects of each illustration can be toggled off and on to create adjustments cleanly and efficiently.
Storing Illustrations
After the images are pre-tested and revised, they can be used in a range of SBC materials. However, this should not be the destination for the illustrations you’ve developed. Once the completed illustrations have been incorporated into counselling cards, brochures, posters, banners and/or web pages, they must also be properly filed and catalogued. This step will ensure that the completed illustrations are readily available for use in future revisions of the materials, for new materials and/or for adaptations for other settings.
When storing illustrations, it is important to retain a complete set of the layered, high-resolution images that have been developed and used in your SBC materials. Ideally, they will be saved in either TIF or PSD format, along with the flattened, low resolution JPG images that can be easily shared for review purposes. Because TIF and PSD files are usually much larger than their flattened versions, an SBC manager may need to consider investing in a digital storage solution such as external hard drive storage device or digital cloud storage services. Additionally, each illustration must be filed or coded with some unique information about its contents or topic, and hopefully about the project for which it was created, so that if an illustration must be changed, revised, or adapted, it may easily be found in the future.
SPRING would like to encourage SBC managers to also file their IYCF-related illustrations through the IYCF Digital Image Bank. Contributions to the bank are accessible to all online, and are catalogued by country of origin, sector, topic, and keyword, so that any illustration can be easily retrieved for reuse or for future adaptation. Additionally, contributing images to the IYCF Digital Image Bank allows for other organizations to further use and adapt illustrations for other non-profit use, with credit to the original creators. It is the hope of SPRING and UNICEF that the IYCF Digital Image Bank may serve as a digital repository of IYCF-related images from around the world. Contribution of your newly created or adapted images is a crucial part of making the image bank a successful “living” resource. To contribute illustrations to the IYCF Digital Image Bank, please visit the site here, or contact SPRING at info@spring-nutrition.org.
While high-quality illustrations are only one part of a very complex and rigorous process of social and behaviour change, they are crucial elements that contribute to changing hearts, minds, and behaviours. By investing in images and ensuring that nutrition SBC materials have accurate, informative, culturally acceptable, and attractive visuals, we are helping people to better understand, appreciate, and adopt the knowledge and care practices that will improve nutrition and feeding practices in their communities.
To view the appendices, please download the full report above.